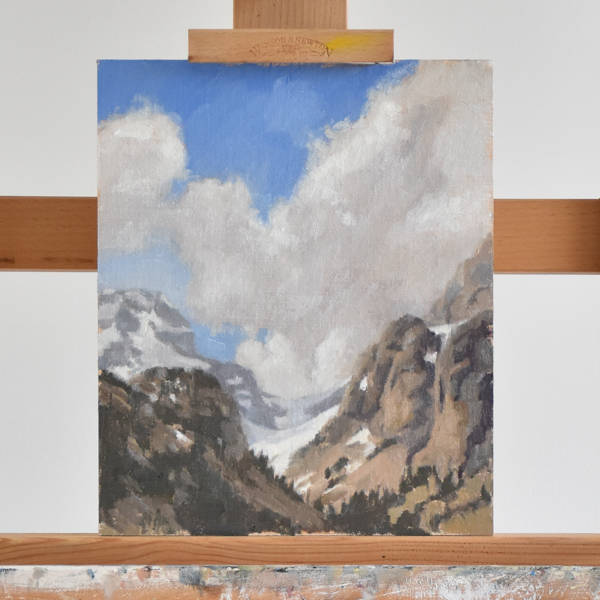
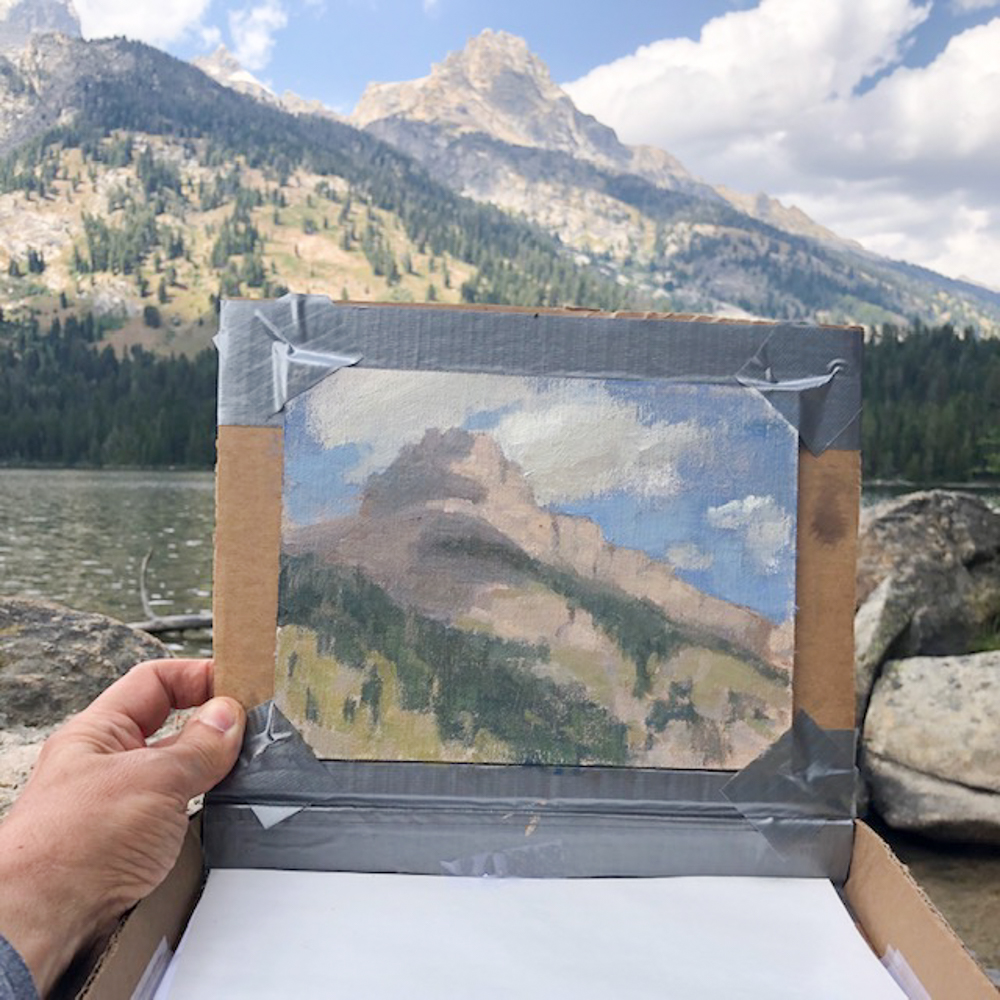
Below I will outline step by step how to paint a mountain in oil using a traditional wet into wet method of painting. This glacier oil painting is a view of a glacier between two peaks in the Tetons.
How to paint mountains step by step
Painting mountains is like painting anything else for me. I was trained using the traditional method and use this time tested method to develop each painting.
- I start with a wash of burnt sienna and ultramarine blue and paint thinner over the canvas. The point of this is to get rid of the WHITE canvas. It’s hard to judge colors you put down when they are sitting on a bright white canvas.
- Next I sketch in the shapes loosely. I use the same mixture of burnt sienna with a little ultramarine blue and thinner for this. Charcoal can also be used.
- Starts with darks. I paint in my shadows. Shadows can be used to strengthen the design of a painting. This is where you can look to connect some of your dark shapes for an even stronger (simpler) design base.
- Next I put down some color. Just dabs of color to make sure my relationships are working. Start with the color you know. For example in this painting I knew the sunlit snow was going to be a warm white. I put that down because I knew it was correct. Then I put the snow in shade next to it, comparing to the snow in light.
- Continue working around the painting in this manner, putting down paint strokes in different areas. The idea behind this is to avoid spending 5 hours on one small area putting in all the details, then discovering you painted that whole area too dark. Or too light. Or too warm or cool. You get the idea.
- It’s important at this point to keep scanning your entire painting. Just because I put one color down and move to the next doesn’t mean the first color was wrong. I’m continually correcting. You can see this happened below in my WIP shots.
- Continue working in this order: darks, put in a dab of the lightest light, work in mid values, then finally lights. The idea is to cover all the canvas with paint, then you can better judge the relationships between colors. Then come highlights which should be very very minimal.
- I always let my painting sit over night and then come back the next day with fresh eyes to see what needs further work. You can see below where I marked all the things I felt needed adjustment with red circles the next day.
In addition to using these steps how to paint a mountain, it’s important for me to get just enough variation in shapes and values to make the mountains look like mountains without overworking and painting with too much detail. Too much detail, and no mystery, takes the life out of a painting. This is always something I try to remember when painting.
For this reason, plein air painting suits me because there is a time limit. I can only do so much in the hour and a half I have to paint before the light changes. So I have to prioritize and paint what is important. This is an easy way to force myself to leave out detail. There just isn’t time!
My work in progress shots
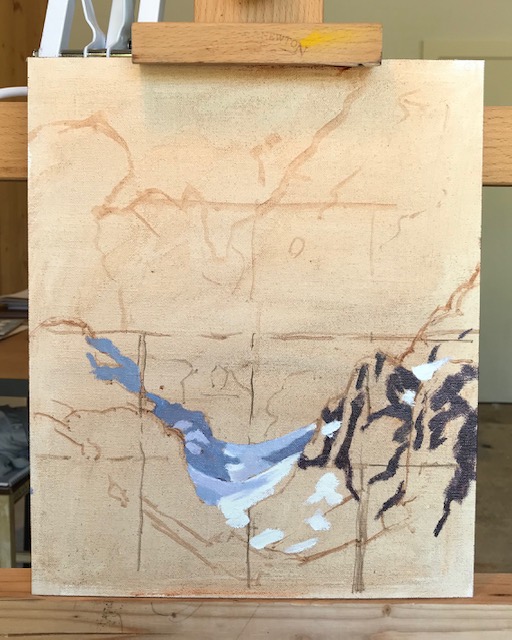
The sketch and darks. 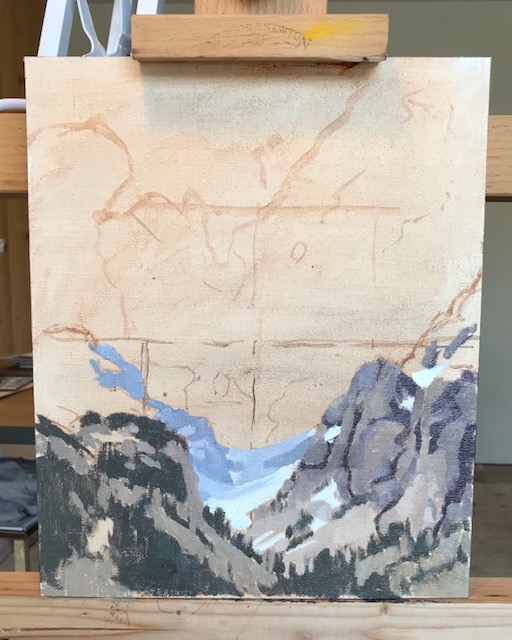
Mid values. 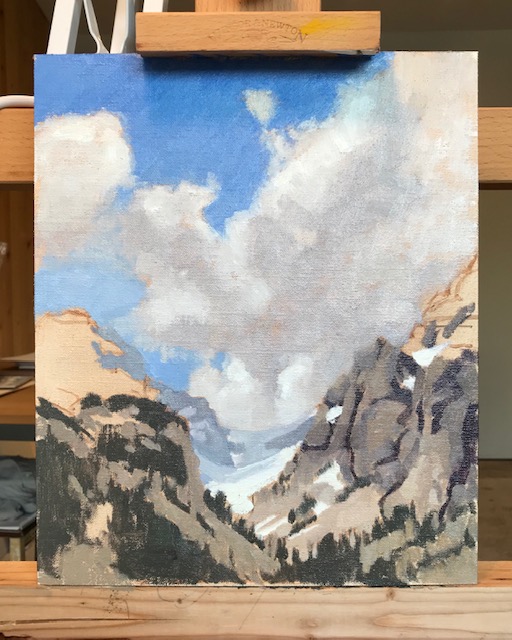
Lighter values (clouds).
In the first photo I put in the sunlit white snow because I know what color that is. Then I added the snow in shade. You can see by the third shot I had decided my snow in shade was too dark and too blue, so I lightened and neutralized it.
There was also too much contrast between the sunlit face of the mountains on the right and the shadows in the crevices of the mountain. I eventually brought those two closer together by darkening the face. Also transitions between the darks and lights are important and necessary.
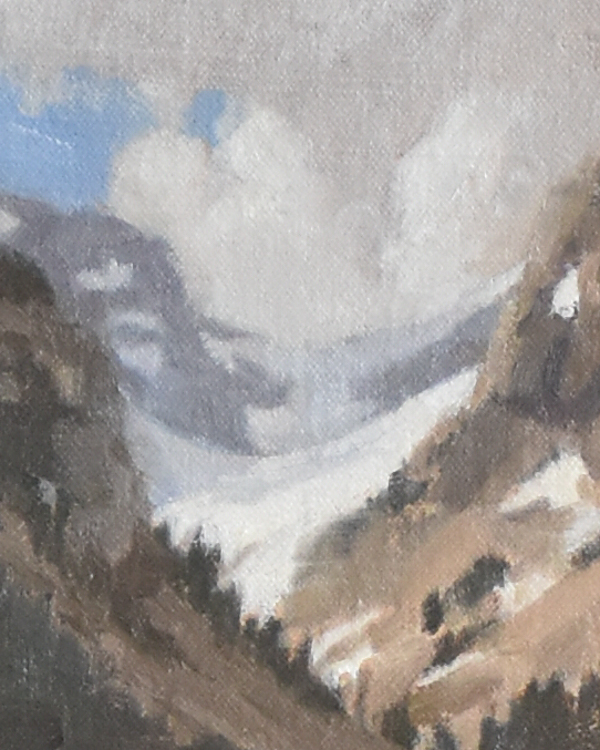
The passage where the clouds meet the top of the glacier is a very delicate passage. By that I mean the values have to be just right. I lightened the value of the clouds just a tiny bit so the glacier would stand out more. I actually love these very fine value adjustments, that’s one of the things that make painting fun for me. There is always a choice, I could have lightened the clouds or darkened the glacier.
See your mountain painting with fresh eyes
As I always do, I look at my painting and see something to fix! This can go on way longer than it should but it’s important when I think about how to paint a mountain. I looked at my painting the next day, or even that evening, and quickly saw what I wanted to adjust. (always something!)
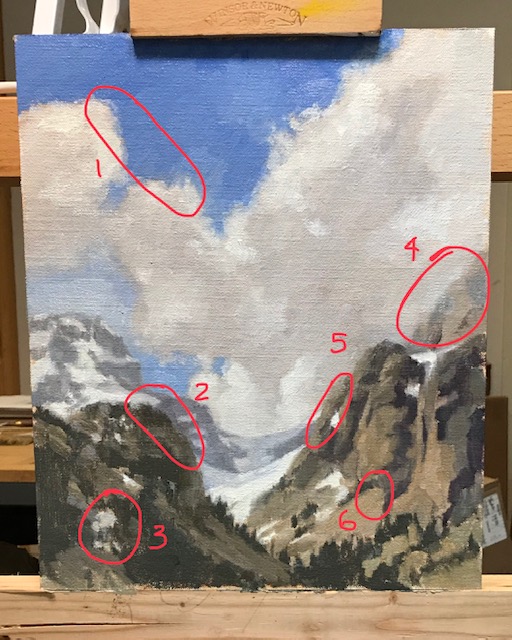
What needed to be changed in my mountain painting:
- These two clouds repeated the same shape.
- Two things here. One has already been adjusted. The snow behind the dark trees on top of this rounded mountain are dark and they sat right below very white sunlit snow. This high contrast area drew my eye there but the focal point is really the middle glacier and snow part of the area. I used artistic license and made the snow right above the dark trees darker, as if that snow were in shadow.
- This white snow in the middle of all this dark was too attention getting, especially in the foreground. After darkening the white it was still too much of a distraction so I ended up getting rid of that snow patch. It wasn’t necessary. Sometimes what you leave out of a painting makes it stronger.
- This far mountain is lighter and has less contrast because it’s farther away. But I had it looking too far away. So I ended up darkening the values a bit and gave the mountain faces and crevices a little more contrast.
- This is just a drawing error. Easy! These mountains and fairly new so they have lots of sharp faces. This edge is close to the focal point and I felt like have a distinct angle would be helpful.
- This shape was not exactly like the photo I was using but I decided it was close enough. I’m not making a replica of the mountain, but more importantly trying to capture the feeling or atmosphere of a mountain.
Final steps
When I’m happy with my painting I let it dry, varnish it, and frame it. And then start thinking about the next painting!
Words of encouragement
One of the wonderful things about painting is that each painting we create is as unique as we are. One of the hardest things for an artist is to find his or her own style. Art is so easily accessed that it can be overwhelming to see so many different styles, and I admit I love many different styles of painting.
We all borrow little things from other painters. I’ve taken a few workshops and I come away from each one with just a few tidbits of information. Maybe a new paint color from somewhere, some good technical lessons from another. But in the end we are each a composite of all the experiences we’ve had: both inside the classroom or studio and out.
I find that when I paint without thinking about a style, my “style” of painting naturally happens. That’s one of the things I love about plein air, there just isn’t time to do anything else but put your heart and soul directly onto the canvas. It’s the part, the “directness”, that brings out our unique style.
I want to show you two very different ways of painting mountains below. They are both wonderful and certainly unique to the artists. I hope you find my words encouraging when you think about how to paint, not just how to paint a mountain.

Van Gogh 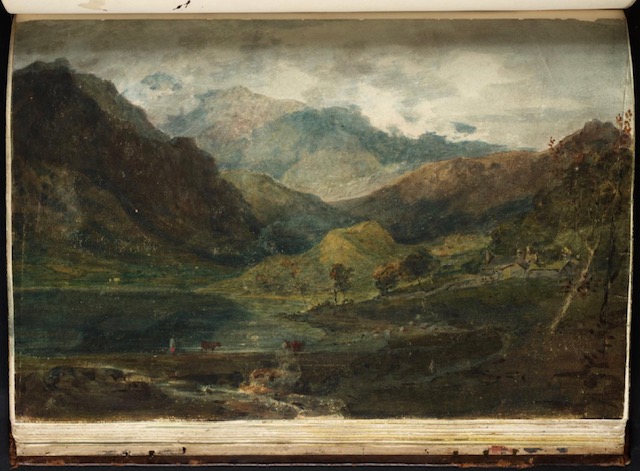
J.M.W. Turner
Favorite hike
And now I’ll share some about the hike where I took the reference photo for this painting. This painting is from a reference photo I took on one of our favorite hikes. It’s not always practical (or easy!) for me to carry my plein air painting equipment so many miles into the mountains.
The hike up to Taggart Lake and then another couple of miles on to Bradley Lake is one of our favorite hikes in Grand Teton National Park. It’s usually lunchtime by the time we get to Bradley Lake so we sit next to the water on a rocky beach and have our picnic lunch.

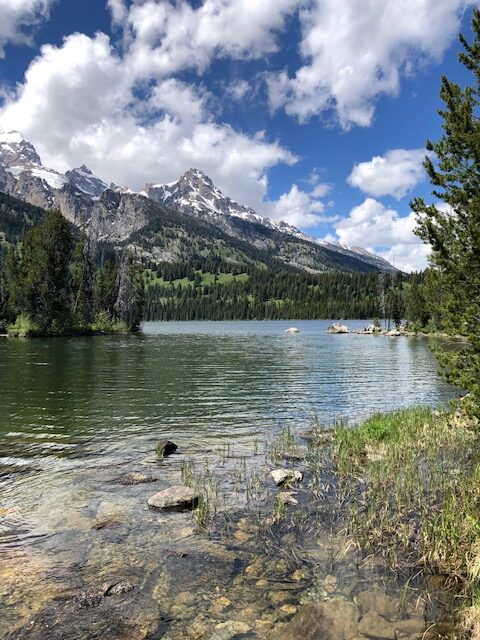
We’ve picked huckleberries along the trail, seen a bear or two, and we always enjoy the 7 mile hike. We attempted the hike in June but shortly before we got to Bradley Lake, and the view above, the trail was so covered with snow that we couldn’t even find the trail. I’ll bet the view of the glacier was very different in June when there was still snow up at those elevations but unfortunately we just couldn’t get there.
I hope you have enjoyed this post on how to paint a mountain.
Later edit: On another day on this same hike, I painted a different mountain and sold that painting while it was still wet! It doesn’t get much better than that for a hiking and painting outing. To see more about that day read my post on selling a plein air painting while it’s still wet.
Great mountain painting lesson! You touched upon so many basic good practices- and the detailed description of areas tweaked was especially helpful.